Tutorial: Create your own Transfer Curve for any Quad Inkset,
Printer and Paper Combination
Jerry Nevins
January 19, 2001
Creating a custom profile for your own particular paper/ink and printer combination
is not hard once you understand the basics. In order to gain control and realize
the maximum potential from your paper and ink combination, it is essential
for you to profile your system and create your own transfer function curve.
Complicated work-around schemes involving extreme CMYK curves are not necessary
and involve much more work. This procedure is for the Windows PC platform.
The principles would work for the Mac as well.
Benefits of this workflow:
Create your image in grayscale and stay in that workspace.
Epson has created an excellent driver for its printers. On the 1160, using error diffusion and any quad ink, there is no visible dither... why work around that?
True WYSIWYG consistency from monitor to print.
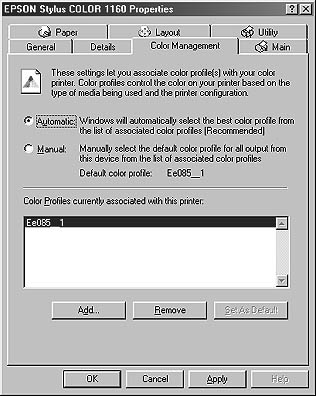
Step 1. ICM Profile Make the original icm that shipped with the Epson driver the default profile. You might remove any extra profiles at this point. In Windows Click Start>Settings>Printers. Right click on the printer icon and click on properties... select the color management tab. This is what you should be seeing:
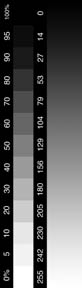
Step 2. Perfect Reference. You have to have a standard, perfect grayscale ramp to calibrate to. An easy reference I have found is to have an online photo print service print your grayscale ramp for you. Even at 72 dpi, the quality will be fine. I have had excellent results with Ofoto. The grayscale print they returned to me was perfectly neutral with an even, stepless gradation from black to white. I would send 2 files... an 11 step and a 21 step. Size them to fit on a 4x6 print.
How to Create an 11 step and a 21 step Grayscale Ramp.
Step 3. How isYour Monitor ? Put up your stepwedge on your monitor and run the Adobe Gamma routine. Start>Settings>Control Panel>Adobe Gamma. Follow it as long as your stepwedge is behaving itself... The goal is to see a separation in the 95-100 step as well as the 5-0 step. This routine is more than adequate for grayscale work.
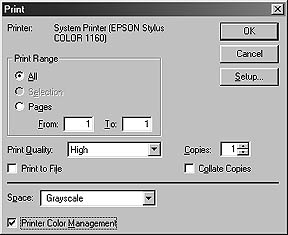
Step 4. Print Stepwedge. In the Epson driver, choose the paper stock to match what you are using...Matte heavyweight for watercolor and Matte papers, Photo quality glossy for glossy and semi-matte paper. Click advanced...Print at 1440 dpi, color control on, high speed off. Keep the sliders zeroed out. Use error diffusion. Space: Grayscale ...Printer Color Management checked.
Here is the first dialog box when you first click print:
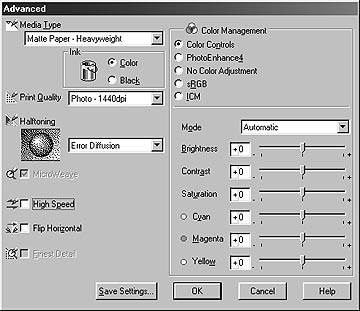
And the Advanced dialog box after clicking on the "custom" radio button:
Step 5. Compare Epson print to the print returned from the online photo service. You have to compare the tones now without any paper white intervening... I cut the Ofoto print to reveal the steps of the stepwedge right at the edge of the paper. When this is laid right on the inkjet output, it is easiest to compare the tonal differences. Alternatively, you can punch holes in the stepwedge with a hole punch to reveal the comparison tone through the hole. Squint at it...really! Be critical! How does the 50% on the C-print compare to the inkjet equivalent? Is it lighter? How much lighter... does it look like the 40% on the C-print? Piezography inks do print a lighter 50%... MIS are matched at the 50% but off in the lights and darks..read on.
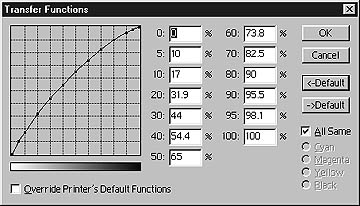
Step 6. Make a Transfer Curve. Now open the transfer curve dialog box from Photoshop....File>Page Setup>Transfer.
![]()
Notice that the Black is on the right and white is on the left... don't let that throw you....That's just a peculiarity of Photoshop. In the case of the Piezography inks, because the 50% value printed lighter than it should have, enter a higher value say 65%. Continue on this way, comparing each injet value against the reference print. Be sure to save the TF curve and print it. Compare the new print to the reference print and tweak the values in the TF dialog box. Keep doing this until your injet print perfectly matches the reference print. Be sure to save the final curve and congratulate yourself!
Here then is the curve I arrived at using Epson Archival Matte paper using Cone Tech Piezography Inks on the 1160 printer:
Here is my curve for MIS quad tone inks, Epson Archival Matte paper and the 1160 printer:
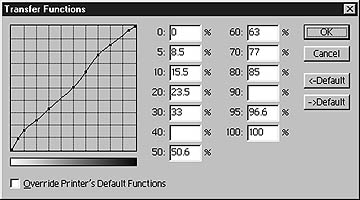
Notice that the curve is not as smooth. The mid-tone MIS ink prints close to 50% as is but the highlight and shadow ends of the spectrum needed help. Tenths do matter. The inks are sensitive to small changes in the TF boxes.
MIS inks are capable of rich, fullscale prints when time is taken to apply the proper curve.
Your first curve should take a couple of hours to complete... after that, they go much faster. With this technique you will be able to render a smooth, seamless grayscale using any combination of ink/paper and printer.
When you are ready to print one of your grayscale images, open the image, go to page setup and click on Transfer Function. Load the finished curve (you did save and name it, right?) and click okay. Set up the driver as previously discussed. When you close the image file, photoshop will ask if you want to save the changes. It will save the image with the Transfer Function curve permanently associated with this image if you choose yes.
Good Luck!