Creating a Transfer Function for any Printer/Ink/Paper Combination
For Macs
Creating a custom printing profile for your particular printer/ink/paper combination is not difficult once you understand the basics. The following sequence provides a step-by-step procedure for testing any printer/ink/paper combination you choose to use to print your creative work.
1. Launch Photoshop
2. Open the Stepwedge.psd file that you created in an earlier exercise.
3. Make a print of this step wedge. Compare it to the one that you got back from the on line printer. Put the reference print right on top of the inkjet print you just printed and look carefully at the various steps. Cut the top off the reference print, if necessary so there is no white space interfering with your judgment.
4. Look at each step on your printed step wedge and its counterpart on the reference print Which steps are blocked-up, (either too light or too dark) compared to the reference print? Really get up close to inspect the steps on the strip carefully. Squint at it by looking through your eyelashes. We are looking only at tonality (how light or dark certain tones are in reference to the other tones on the step wedge). If there are any colorcasts in any of the grayscale steps, we will eliminate them when we make the Photoshop Curves adjustment later.
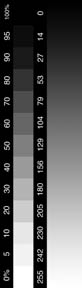
5. To make adjustments, choose File > Page Setup. Click the button in the dialog box to open Transfer Function. Scan the overall step wedge to see which steps need the most correction. These are the steps that you should address first. You may not have to put a number in every value field because changing one field will affect all others.

6. Choose the steps that need correcting. Certain steps on the step wedge are not important when evaluating the step wedge in Transfer Function because there are no input fields for these values in the Transfer Function dialog box. The steps that are not applicable are 85%, 75%, 65%, 55%, 45%, 35%, 25%, and 15%. Higher numbers correspond to darker tones and lower numbers correspond to lighter tones.
7. Start with one field correction to see the changes that take place in a new print of your step wedge. For example, if your dark tones print too light, start there first. If the 95% patch is too light, enter a higher number value, say 97% or 98.5% to make it print darker. (If the patch is too dark, enter a lower percentage number in the value field to lighten the patch, say 93% or 91.5%.)

8. You have to experiment with various percentages in the number field to see what will be more correct in the final print. Keep in mind that you can enter percentages in tenths of a percentage, (i.e. 98.5%) and that a small change may make all the difference you need.
9. When you have made one adjustment in the Transfer Function dialog box, reprint the step wedge again. You should be able to see where the changes take place when comparing it to your original step wedge. Are the new changes you've made an improvement? Compare the new print to the reference print again. Is the change too much or not enough of a correction? Go back and tweak the value again, printing between each correction, until you are satisfied that the patch you are correcting matches the tone of the reference print. This may take two or more reprints of the step wedge to achieve.
10. Look again at the overall step wedge. You now know that you have one patch on the step wedge that looks correct. Now how do the other steps on the step wedge look? What other steps now need to be corrected? Continue making adjustments in the Transfer Function dialog until you are satisfied that the full range of steps in the step wedge print correctly.
11. At this stage of the process, it is simply a matter of trial and error with various percentages, until you achieve a step wedge print that matches the original reference print. Remember, the whole process is trial and error and all decisions must be made visually. If in doubt about the correct matching of your tests to the reference print, check with your instructor.

Thanks to Professor Don Cyr and Don Eby, Southern Connecticut State University, New Haven, CT, for preparing this guide.