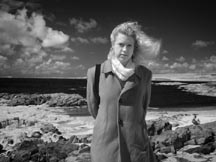
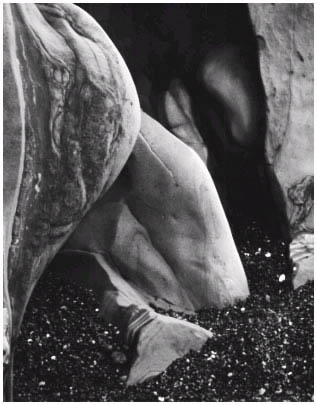
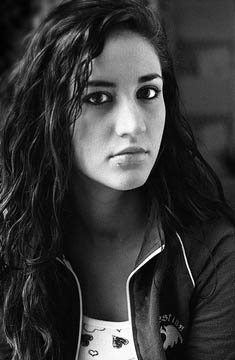
New Dimensions Student, Skye Cornell on the North Atlantic Coast, near Roundstone, Ireland. Irish Journal course, May,2000.
Digital
infrared quadtone print.
Jerome Nevins
Syllabus
Digital Photography
Albertus Magnus College
Jerry Nevins, Professor
Contact Me
January 17- March 7, Mod 3, 2007
|Class Blog Section 1 |Online Galleries | Readings |Video tutorials|
______________________________________________________________________________________
Overview:
This course in Digital Photography is designed to develop your skills in pixel
based photographic design and printing. The dream of film-less photography
his finally become a reality. Cameras, printers, inks and paper have evolved
that are able to not only match traditional continuous tone photographic quality,
but can also extend traditional possibilities. In this first introductory
course in digital photography, we will use this new found power to create,
edit, post and share our images electronically. These tools lend themselves
perfectly to an online course.
About this online course experience:
This is the first online course the Art Department at Albertus Magnus College has offered. The promise and potential of offering a course not bounded by time or space has amazing implications. In a traditional studio art course, there is a very high degree of interaction not only between the instructor and students, but just as importantly, between the students enrolled in the course. Art production is about learning craft, design, history, culture and self expression. Students synthesize these elements to create a portfolio of work that reflects not only their newly developed skills but also is tangible evidence of the more important appreciation of Art within the particular medium studied. There is much subtlety in the process.
The potential pitfalls of an online experience then are about the lack of your direct contact with the instructor and other students. To overcome this, we need to create a lively online community. To that end, I have created an online class blog here: http://digitalphoto1atalbertus.blogspot.com/ Your success in this course depends upon your active participation in this blog. Here you will post your images to share with the class. Use this site to react to other's work, write about your own ideas, and communicate to the rest of the class your successes and challenges faced in working through the assignments. To learn how to post to the class blog, see this.
As a studio art course, you will be assessed not by tests or writing papers
but mainly by your visual work leading to a final portfolio of images. Your
ability to grow in the medium, try on new ideas, learn to communicate using
the language of this medium, to appreciate ideas and trends in historical
as well as contemporary photographic art will all contribute to your grade.
Course Goals: ·
To become proficient at the technical aspect of photographing with a digital
camera and working with those images including digital editing, saving, sizing,
posting and printing of those images
To extend the possibilities for photographic printmaking to the digital realm.
To develop and practice skills using digital photography tools and the Internet
including emailing and posting to a web site.
To learn to shoot with digital cameras... and learn to maximize the quality of the output from them.
To appreciate more about the "Photographer's Art" through the study of historic and contemporary trends and to apply that appreciation to your own work.
To develop the habit of looking closely at the visible world around you in
order to represent it in terms of aesthetics and truth.
Topics:
To begin to learn about the history and aesthetics of fine art photography
and to apply that understanding to your completed assignments.
To understand the use of all tools found in Picasa2 software.
Understand managing image files... saving, opening, uploading, posting, etc.
Gain proficiency with image editing for maximum image impact.
File size and print size
The use of scale
Electronic images
their scaling and use: imaging for the Internet
Assignments:
Week 1
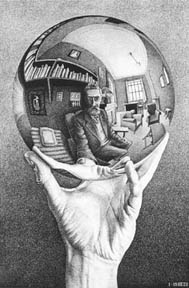
Post an image of yourself on the class blog and tell us something about yourself. You may shoot a self portrait using the self timer on your camera or more creatively, shoot a reflection of yourself in glass, mirrors, steel, shop windows... what can you imagine? Try using the search term "self portrait" in Google Images. Not to stress about this one though... have fun! E-mail me if you have any issues, problems, etc. Click the "Contact" button above.
Look at these self-portraits posted to Fotothing. Create your own Fotothing account to post your images to.
Read 10 tips for great pictures at Kodak. Read Digital Camera Controls
Read my article on pixels and resolution.
By the end of week 1, you are comfortable with using your camera, moving images around and posting and emailing them. All systems are working! Picasa is installed and working, you can open and edit your pictures, you know how to post to the class blog, upload to fotothing, link to me as a "friend" and communications with me and other members of the class are easy.
You have posted a portrait and introduction of yourself to the class on the blog and have done all of the reading.
Read through my syllabus for the Introduction to Photography class offered in the day program as a darkroom course. Pay particular attention to the section entitled "The Classic Approach" Click through the many links regarding cameras, lenses, film, etc. to learn about technical issues in photography.
The following question was answered by one of my A level students....
Question: What are some of the key elements you would notice and utilize when composing photographs within a given frame?
Answer: Light: my first consideration is always light, whether it be a portrait or urban structure. I determine what kind of light is best to make this frame successful. This could be window light, or natural light during the golden hour of the day.
Focal point: what is the main area of focus? Is it a persons face or the outdoor lamp on one of my buildings? I then decide where this point should be placed within the frame. I always start with the rule of thirds placement and go from there. More times than not that guide works well.
Line: what lines are initially obvious? Are they diagonal, horizontal, vertical? Can I change the direction of these lines by changing the position of the camera to make a more dynamic composition?
Color: what colors are involved? In the case of a portrait shoot, I can plan the colors pretty easy. If I am shooting outside, I can seek out color that I am drawn to or colors that work well together I usually keep the color wheel in mind. The light can enhance color and change that color value altogether.
Shadows: I love shadows created by strong late afternoon light. These can be utilized in the frame to a great advantage in the composition. Or they can destroy the composition in a portrait if not controlled wisely.
Simplicity: Keeping the composition as simple as possible is usually always best. I try to frame the subject to eliminate any surrounding distractions. This can be achieved by camera position, and the type of lens used and depth of field control.
Economy of the frame space: I usually try to fill the frame to eliminate cropping since this results in a smaller image overall.
You should take the above list along on each and every assignment ofver the next few weeks, until seeing all of these elements simultaneously becomes secone nature.
Week 2
Introduction to Composition
We will learn to use line, mass, value (tone), contrast, color, and selection consciously in the creation of your images.
A big part of the photographer's art lies in one's ability to organize the visual chaos of the visible world. You learn to clarify, simplify and present your environment with intention and control. Here, we will learn to go way beyond "taking pictures", accepting whatever "comes out of the camera", and move to "making photographs" through your careful looking at your subject before shooting.
Reflect on the concept of selection and looking at the edge of the frame to consciously decide what to include and not incude in your image. Appreciate light and form and how that is central to your work for this class.
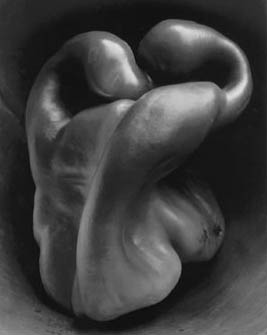
Look at the work of Edward Weston. Consider this image:
Edward Weston used his 8"x10" camera to photograph this small green bell pepper set in a simple wooden bowel by window light. Notice how he moved in, and filled the frame with the form of the pepper. The simple elegance and direct presentation of the pepper has transformed it from a mere description of an ingredient in tonight's dinner to an image that is transcendent.
Read PhotographyNot Pictorial, Edward Weston, Camera Craft, Vol. 37, No. 7, pp. 313-20, 1930
Browse through Weston's other natural forms.
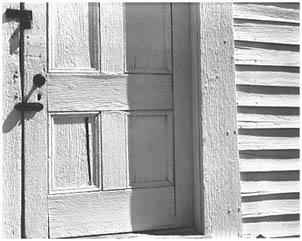
Assignment: Downtown
Photograph shapes, reflections, light and pattern in an urban or town environment paying particular attention to the shapes you select in the frame and the quality of light on the subject.
Avoid being far away or showing a whole building. Always shoot with natural light. Never use flash in this class... get in close, fill the frame.
Read about Paul Strand.... His work in New York City in the early 20th Century defined how photographers could use new ideas of modernism championed in painting to great effect.
Read The Art Motive in Photography, Paul Strand, The British Journal of Photography, Vol.70, pp. 612-15, 1923
Browse through my portfolio of images from my "Connecticut Towns" project, particularly Stonington and Noank
You may work in black and white. Picasa2 makes it easy to convert and tone your images. Adjust the tones using Picasa's advanced editing tools.Submit your best two images on the class blog and post 6-10 or more to your fotothing album. (Links in academic expectations below).
Week 3
Assignment: By the Sea
Look at Weston's work at Point Lobos, California. What kind of light did he photograph under? How did he move in and compose what ever he was looking at? For each photograph, consider the point of view Weston and the camera position.
Weston got down, got close to these rock forms on the beach. I want you to do the same
Read this short biography of Ansel Adams. Browse through his images of the American west.
You are to visit the beach, and look carefully at form, light, composition and line. Examine tidal pools, rock formations and sand patterns with the curiosity and freshness of a young child, say a toddler. Move in close, fill the frame. Submit your best two images on the class blog and post 6-10 or more to your online album. (Links in academic expectations below). If you live well inland and would prefer to visit a waterfall or brook with moving water, that would work too.
Week 4
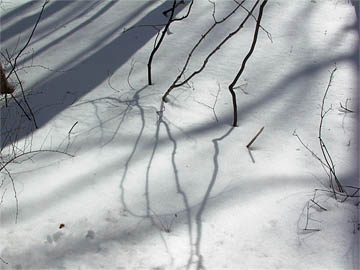
Shadows and Light
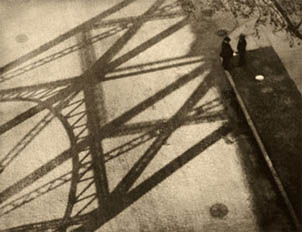
Consider this gallery of photographs by amateur Greek photographer, George Christakos. Notice how the photographs are about the quality of light... and shadow. Shadows take on a materiality that is just as strong as the architectural elements depicted, perhaps stronger. Use the widest focal length setting on your lens. Look for shadows as geometric form this week. Start around your home, downtown, or anywhere your travels take you. Look down, look up, fill the frame.
Light reflecting directly off water can be interesting... throw in dramatic clouds...perhaps at sunset... convert to black and white...
Chairs, railings, your back deck, light streaming in through windows casting shadows.... shadows made by people walking downtown...
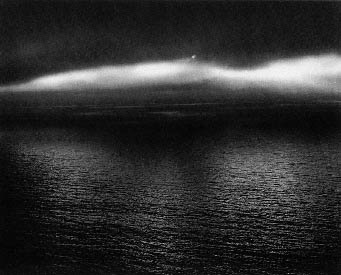
Read this short Britannica entry on Minor White.
Read Equivalence: The Perennial Trend Minor White, PSA Journal, Vol. 29, No. 7, pp. 17-21, 1963
How can we use light as poetic metaphor?
Submit your best two images on the class blog and post 6-10 or more to your online album. (Links in academic expectations below).
"A very receptive state of mind... not unlike a sheet of film itself - seemingly inert, yet so sensitive that a fraction of a second's exposure conceives a life in it". -Minor White
In Windowsill Daydreaming (left), Minor White has found a projection of light rather than shadow to photograph. Can you find a beam of light to photograph?
Week 5
God is in the Details: Altered scale: Large images from tiny object(s) (The macro project)
Read The Photographer's Eye, John Szarkowski, Introduction to the Catalog of the Exhibition
Most of your digital cameras have the wonderful ability to get really close to things and keep it in sharp focus. This is called "Macro" photography. Find out how close your camera can get and shoot everything this week from this distance. My Nikon coolpix can get to within 3/4" of the subject and keep it really sharp. Each camera is different so look it up in your manual. If you have a scanner at home, consider using it as you digital camera for the week. Scanners capture remarkable detail... better than digital cameras....
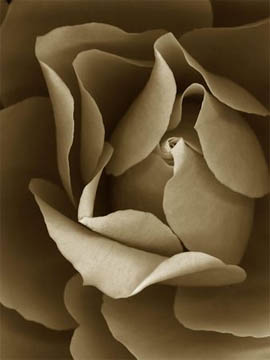
Browse through Albertus graduate Robyn Thomas' online portfolio of scanned flower forms. She filled our MacDonough Gallery with 16"x20" prints of these wonderful images as her senior project as an art major. All of these images were created using a flatbed scanner. She paid attention to design and light. She discovered form inside the flowers rather than just taking a picture "of" a flower... the flowers were a springboard to exploring formal elements of art and design.
Diane Vetere has been published and shows internationally. Click "flowers" at the top of the page. She let her lilies die in the soft drink, Sprite, creating beautiful forms that she scanned and made large 24x24" prints.
Technique: When scanning a flower, leave the lid of the scanner up. Preview the bed of the scanner then select just the area you want. Only then click scan. Here is where you choose how large a scan you'd like. Since most of our work is posted online, this won't matter... If you'd like to make prints, go back and reread my article on resolution.
If you don't have access to a scanner take a look at:
Chrissie's macro
picture a day from Belgium.
More Florals.... Visit
a greenhouse... how's your garden? Mariam El-Mofty from Egypt. Use the macro
setting on your camera, move in close!
Submit your best two images on the class blog and post 6-10 or more to your online album. (Links in academic expectations below).
Week 6
The Digital Portrait
I call this assignment "How to Fry an Egg".... Everyone thinks they know how to do it but when you come right down to it, there is a lot of technique involved and there is plenty of opportunity to mess it up.
Here's what I'd like you to do... Find someone you know, love and trust. This can be a child, spouse, best friend, parent... you get the idea. Take them by window light. Watch the light on the face, wait for an open, truthful expression and create a simple but beautiful portrait. (No flash!). Use a piece of white cardboard, a sheet or other white object to reflect light back into the shadow side of the face. Take your time... there's no rush. If your model puts up a fuss, find someone else. Can you do it? Here is student work from the same assignment posted at Flickr....
Use the Picasa2 tools to adjust light, contrast, grayscale (if you'd like). Notice how the student took many images... Hold the camera vertically, use the telephoto (zoom in) setting on your camera, steady your hand or use a tripod. Don't make your subject smile, just relaxed and truthful. No candids either....Crop the photo like this....
Post your best 2 images to the blog, tell us about them and add an additional 6 - 10to your online gallery.
Another worthy window light portrait with no reflector.
These include the window...
Okay... you can do your pet... but it's harder... look!
Tips... No direct sunlight, simple background, quiet expression... take your time. These portraits, if done well will be far better than most commercial work from low end Sears Portrait Studio images up to high end commercial photographers... Most commercial work is over produced and artificial. For your work to be good in this assignment, I am looking for a simple, true, honest and direct portrait... it doesn't get better than that.
Week 7
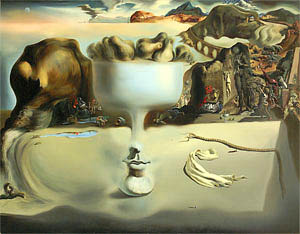
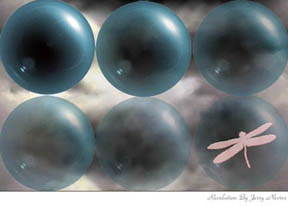
The surrealist aesthetic: composited and constructed realities.
You have to systematically create confusion, it sets creativity free. Everything that is contradictory creates life. ::: Salvador Dali :::
Last autumn, The Wadsworth Atheneum in Hartford celebrated the return to its permanent collection it world class examples of Surrealism in their permanent collection. The show was entitled Dalí, Picasso, and the Surrealist Vision "Surrealism is a style in which fantastical visual imagery from the subconscious mind is used with no intention of making the work logically comprehensible." Read more at the online Art Encyclopedia.
Look at the work of Dali and Magritte
"Surrealism is an artistic, cultural and intellectual movement oriented toward the liberation of the mind by emphasizing the critical and imaginative faculties of the "unconscious mind" and the attainment of a state different from, "more than", and ultimately "truer" than everyday reality: the "sur-real", or "more than real" Read more here.
Go to the Athenaeum's site and start your paintings.
Read Article on Photographer Man Ray... Surrealist and Dadaist
Post 1of your surreal constructions to the class blog... post a total of 6 -10 images to your online portfolio.
To save your creation from the Athenaeum site, bring up your image, hit the
"print screen" key on your pc keyboard. (Use grabber on a Mac).
Make sure that the objects are de-selected if you are capturing the image
before publishing it (while still in the JAVA application or there will be
odd squares and messages on the image. Go to your image editing application,
Paint, (not picasa) and go to menu item FILE>NEW>ENTER then after the
new blank file opens, EDIT>PASTE. Select the area of just the image using
the rectangle select tool. EDIT>COPY. This puts this portion of the image
in your computers memory or clip board.Next FILE>NEW again, EDIT>PASTE
and there it is... cropped and ready to save.. Remember to save the file as
a .jpg (It will be a .bmp by default in Paint and Fotothing or the blog won't
accept that file.Now upload from there. All PC's come with a free image editor
called Paint located in the Accessories submenu... Remember, Use your free
built in image editor called Paint... to find it hit the start button, PROGRAMS>
ACCESSORIES>PAINT. Save the file as a jpeg (.jpg), not a .bmp.
Academic Expectations:
Post at least twice a week to the class blog. Care about the quality as well
as quantity of your creative work, help and collaborate with others in the
class, communicate openly with me
. Do your best. Your portfolio posted to
Fotothing will be the tangible
evidence of your progress in the medium but your overall contributions will
play a role in determining your grade as well. Don't wait until near the end,
then run around and try to get your work done in a rush... that's like skipping
class all semester. Go shooting each week, post each week, let me track your
progress on your fotothing.com portfolio. You may keep working on earlier
assignments until the end. You may replace earlier work with newer work you
like better. Your final grade is based on "The Big Picture", that
is, how well you have tried to understand the assignment and worked to create
pieces reflecting the spirit of the task at hand, your progress in the medium,
your contributions through posting comments on other's work on the class blog
as well as on fotothing, Effort counts!
Technical Requirements:
-A digital camera with usb cable to connect to computer usb port or a card reader, connected to your usb port (preferred).
-A reliable internet connection from home. Broadband is preferred and is cheaper than dial up for most people at this point.
-A Pentium III (minimum) or Pentium IV CPU, windows computer running Windows XP or Windows 2000. You should have at least 512 mb of RAM. Your browser should be Internet Explorerv. 5.5/6.0 or Firefox. You will need to install the shockwave flash player plug-in available free here in order to view the video tutorials I have created for you.
-Know how to install software, create online accounts, upload text and images, and how to save your work into folders on your computer and how to locate and browse to those folders to retrieve it.
Tradition of Honor: As a member of the Albertus Magnus College Community, each student taking this course agrees to uphold the principles of honor set forth by this community, to defend these principles against abuse or misuse and to abide by the regulations of the College. In art work, that means you have taken all of your photographs and have not appropriated any of the images presented as your own.
Special Needs and Accommodations: Please advise the instructor of any special problems or needs at the beginning of the semester or mod. Those students seeking accommodation based on disabilities should provide a Faculty Contact Sheet obtained through the Academic Development Center in Aquinas Hall, (203) 773-8590.
Suggested reading:
Photography And The Art Of Seeing: A Visual Perception Workshop For Film And Digital Photography (Paperback) by Freeman Patterson "On those frosty mornings when I grab my camera and tripod, and head out into the meadow behind my house, I quickly forgot about me..."
Photographing
The World Around You: A Visual Design Workshop For Film And Digital Photography
(Paperback) by Freeman Patterson "This book about observing and photographing
the world around you is a gift to you from my students - hundreds and hundreds
of photographers who..."
Learning
to See Creatively: Design, Color & Composition in Photography (Updated
Edition) (Paperback) by Bryan Peterson "The human eye sees in much the same
way as a 50mm lens, and therefore, the 50mm focal length lens is appropriately
called a normal..."
Photographic
Composition (Paperback) by Tom Grill, Mark Scanlon "Behind every photograph
is an idea..."
Organizing
and Editing Your Photos with Picasa : Visual QuickProject Guide (Visual
Quickproject Series) (Paperback) by Steve Schwartz
Syllabi | Home | Contact
| Albertus | Class
Blog1 | Blog 2|
Videos|

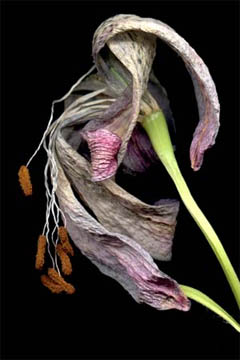
Grey Lilly #1
Diane Vetere, Toronto, Canada
Raul, school assignment...(not from me, jn)
"For my photo class I had to shoot a series of portraits
by a window using the natural light from outside. Also, I had to use a reflector
(in my case, poster board) to bounce some light onto the face. Here are the
results."
Good job Raul....